In our fast-paced world, staying connected while on the go has never been more critical. With the increased reliance on smartphones and various other mobile devices, the need for convenient charging solutions in our vehicles is paramount. Installing a wireless charger in your vehicle can not only simplify your life but can also keep your devices charged during road trips, commutes, and daily errands. In this comprehensive guide, we will explore the essential factors to consider when installing a wireless charger in your vehicle.
Wireless charging works by utilizing electromagnetic fields to transfer energy between two objects; in this case, your smartphone and a charging pad. This is a significant shift from traditional charging methods, which require physical connectors. Most modern smartphones support Qi wireless charging, making them compatible with numerous wireless charging devices. Understanding how this technology works is crucial before you install a charger in your vehicle.

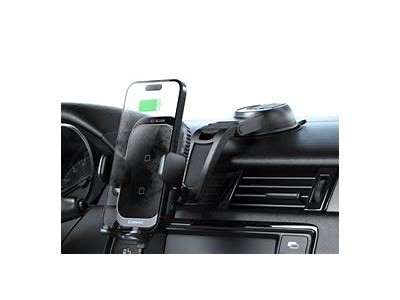
When selecting a wireless charger for your car, you need to consider several factors. First, confirm that your smartphone supports wireless charging and is compatible with Qi technology. Additionally, explore different styles of wireless chargers available in the market, including dash-mounted, vent-mounted, and console-mounted options. Each option has its own pros and cons, especially in terms of ease of use and aesthetic appeal.

Before starting the installation process, it’s essential to gather all the necessary tools and materials. Here's a list of items you may need:

Once you've selected your wireless charger and gathered all necessary tools, it's time to install it. Follow this step-by-step guide to ensure a smooth installation process:

Identify a suitable location for the wireless charger in your vehicle. Consider accessibility and visibility while driving. Common locations include the center console, dashboard, or air vent. Make sure it's easy to reach but does not obstruct your view or interfere with driving.
Clean the surface where you plan to mount the charger to ensure proper adhesion. If your charging pad requires a mounting bracket, decide whether you will drill holes or use adhesive. If drilling, ensure that you do not interfere with existing electrical systems or structural components.
Most wireless chargers will need to be connected to a power source. If your car has USB ports, you can plug the charger into one of those. If not, you may need to use a car charger that plugs into the vehicle's cigarette lighter. Route the cables to keep them tidy and secure using zip ties.
Using your chosen method (adhesive or screws), securely attach the wireless charger to the selected surface. Ensure that it is firmly affixed and will not move while driving.
After installation, test the wireless charger with your smartphone. Make sure it connects and starts charging without any issues. Adjust the position of the charger if necessary to ensure optimal performance.
After your wireless charger is installed, it’s essential to maintain it for optimal performance. Keep the charging pad clean and free of dust and debris. Additionally, if you encounter issues, such as the phone not charging, check the power connections and the compatibility of your phone case, as thick cases can sometimes interfere with charging.
Installing a wireless charger in your vehicle is a straightforward process that adds convenience and reduces the hassle of tangled cables. With the right tools, careful planning, and a bit of patience, you can enjoy the benefits of wireless charging on the go. This modern solution not only enhances your driving experience but also keeps your devices powered wherever your journey takes you.
wireless charger, vehicle accessories, installation guide, smartphone charging, automotive technology ```
转载请注明:willbet Free Online Games » octo attack » How to Install a Wireless Charger in Your Vehicle for Convenient Charging Solutions

Wanted Dead or Alive Casino Guide How to Play Win Strategies and Bonus Features Explained

Effective 5 Slot Machine Strategies to Maximize Your Winning Chances and Boost Your Profits

How to Achieve Consistent Success and Maximize Winnings in Online Cassino Games

How to Safely Download the Hard Rock Bet App for Secure Mobile Betting Experience

Experience Retro Tapes with Our Free Demo Today and Relive the Nostalgia

Find the Best Willbet Confectionery Shops Near You for Delicious Treats

Discover the Exciting Adventures at Cassino 5588: Your Ultimate Gaming Destination

Exploring the Journey and Impact of the 3 Liga Meister in German Football History

Interwetten Withdrawal Issues: Common Problems and Solutions for Users

Exploring WillBet Casino in Delaware: Exciting Games, Promotions, and Regulations

Exclusive WillBet Promo Codes and Bonuses for Online Sports Betting and Casino Players
2026-01-29
Fanatics USA Official Store Offering Authentic Sports Apparel and Exclusive Fan Gear Online
2026-01-26
The Mysteries and Legacy of Le Pharaoh Explored Through History and Culture
2026-01-26
Comprehensive Overview of Willbet Casino States and Their Gambling Regulations in the United States
2026-01-25
How to Use Interwetten Paysafecard for Fast and Secure Online Betting Transactions
2026-01-24Wanted Dead or Alive Casino Guide How to Play Win Strategies and Bonus Features Explained
2026-01-24
Download the Official Mobile Willbet App for Easy and Secure Betting Anytime Anywhere
2026-01-24Effective 5 Slot Machine Strategies to Maximize Your Winning Chances and Boost Your Profits
2026-01-22
Play Sugar Rush and Win 1000 Free Spins with Exciting Rewards and Big Bonuses Online
2026-01-20
Top Online Casinos Where You Can Start Playing with Just 10 BRL and Win Real Money
2026-01-20
